To replace your brake pads, start by safely lifting your vehicle and removing the wheels. Inspect the old pads for wear or damage, then locate and remove the caliper clips or pins. Carefully lift the caliper away from the rotor, use a tool to retract the pistons if needed, and replace the old pads with new ones, making sure they seat properly. Reassemble the caliper, tighten everything securely, and test the brakes. Keep going to learn how to do each step smoothly.
Key Takeaways
- Safely lift and support the vehicle, then remove the wheel to access the brake assembly.
- Inspect the old brake pads for wear, damage, or uneven thinning, replacing if necessary.
- Remove caliper retaining clips, lift the caliper, and retract pistons if needed, then clean parts with brake cleaner.
- Install new brake pads correctly, reassemble the caliper, and pump the brake pedal to seat the pads.
- Reinstall the wheel, tighten lug nuts, lower the vehicle, and perform a gentle brake test to ensure proper function.
Replacing brake pads is a critical maintenance task that guarantees your vehicle’s stopping power remains dependable. Before you begin, it’s important to understand the different brake pad materials available, as each type impacts performance, wear, and noise levels. Common materials include organic, ceramic, and semi-metallic pads. Organic pads are quieter and gentler on rotors but wear out faster, while ceramic pads offer quieter operation and longer lifespan, though they can be more expensive. Semi-metallic pads provide excellent heat resistance and stopping power but tend to generate more noise and brake dust. Knowing these differences helps you choose the best pads for your driving style and vehicle.
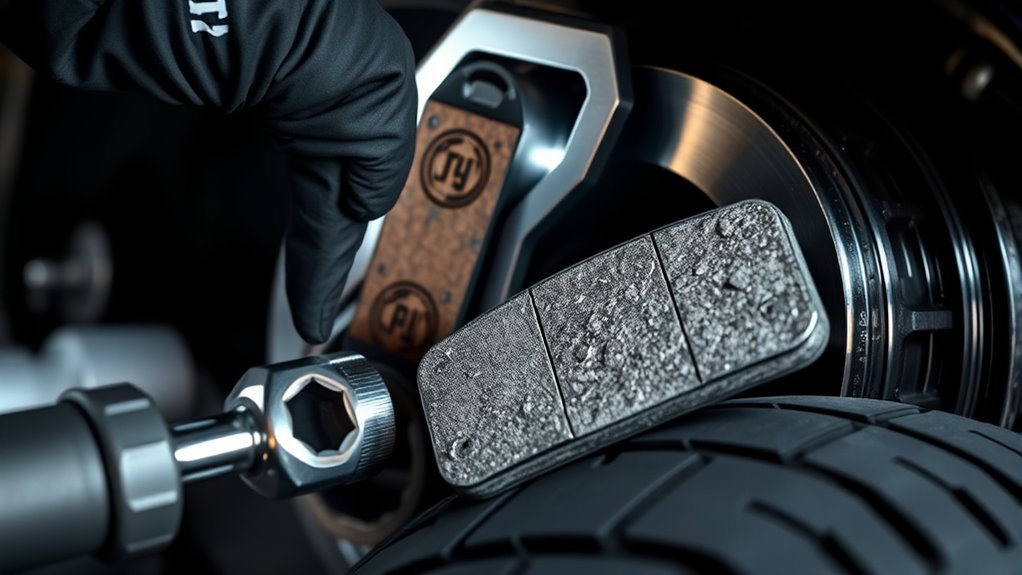
Start your brake pad replacement by safely lifting your vehicle using a jack and supporting it securely with jack stands. Remove the wheel to access the brake assembly. Before doing anything, perform a thorough brake pad inspection to assess their condition. Look for signs of uneven wear, thinning material (less than 1/4 inch), cracks, or glazing. If your pads are excessively worn or damaged, it’s essential to replace them promptly to maintain safety. This inspection ensures that you’re not just replacing pads blindly but addressing any underlying issues that could compromise your braking system.
Perform a thorough brake pad inspection before replacement for safety and optimal performance.
Once you’ve inspected the pads, locate the caliper and remove the retaining pins or clips holding it in place. Carefully lift the caliper away from the rotor, being cautious not to damage the brake hose. If your caliper has a piston, you might need a C-clamp or a brake piston tool to gently retract it into the caliper housing, making room for the new pads. When removing the old brake pads, take note of how they’re positioned, as this will guide you when installing the new ones. Clean the caliper and surrounding components with brake cleaner to remove dust and debris, ensuring a smooth installation of the new pads. Additionally, understanding the importance of color accuracy in your braking components can help in diagnosing issues related to uneven wear or fading.
Next, install the new brake pads, making sure they’re aligned correctly with the rotor and seated properly in the caliper. If you’re switching to different brake pad materials, double-check compatibility with your vehicle. After installing the new pads, reassemble the caliper, secure the retaining pins or clips, and double-check everything is tight and correctly positioned. Before lowering the vehicle, pump the brake pedal a few times to ensure the pads are properly seated against the rotor, which helps prevent a spongy brake feel. Finally, replace the wheel, tighten lug nuts to the specified torque, and carefully lower your vehicle back to the ground. Test your brakes gently to confirm that everything functions correctly, and enjoy the confidence of a well-maintained braking system.

NYXOVA 24pcs Brake Caliper Tool, Heavy Duty Disc Brake Caliper Tool Set, Wind Back Kit for Brake Pad Replacement, Master Disc Brake Caliper Tool Kit Fits Most American, European Makes/Models (Red)
- Effortless Brake Pad Replacement: Easy operation for brake maintenance
- Includes Both Thrust Bolt Types: Right and left-handed thrust bolts
- Universal Compatibility: 18 adapters for many vehicle makes
As an affiliate, we earn on qualifying purchases.
As an affiliate, we earn on qualifying purchases.
Frequently Asked Questions
How Do I Know When Brake Pads Need Replacing?
You’ll know your brake pads need replacing when you notice brake noise, like squealing or grinding, which signals excessive brake pad wear. Also, if your braking feels less effective or you notice a soft brake pedal, it’s a sign the pads are worn down. Keep an eye on the thickness of your brake pads; if they’re less than a quarter inch thick, it’s time to substitute them to ensure safe stopping power.
Can I Replace Brake Pads Without Professional Help?
You can replace brake pads yourself, but prioritize DIY safety. If you have basic mechanical skills and the right tools, it’s doable, but remember that brake pad lifespan varies, and improper installation could be risky. Always wear safety gear, work in a safe environment, and follow instructions carefully. If you’re unsure or uncomfortable, it’s best to seek professional help to ensure your brakes function properly and safely.
What Tools Are Required for Brake Pad Replacement?
To replace your brake pads, you’ll need essential tools like a socket wrench, C-clamp, and screwdrivers. These help with caliper maintenance and rotor inspection. You’ll also require a brake caliper piston tool and possibly a jack and lug wrench for wheel removal. Having these tools ready makes the process smoother, allowing you to perform caliper maintenance properly and inspect your rotors for signs of wear or damage.
How Long Does It Take to Replace Brake Pads?
Replacing brake pads is like tuning a finely crafted instrument — it takes time to get it just right. Typically, it takes about 1 to 2 hours, depending on your vehicle’s brake pad materials and vehicle suspension complexity. If you’re experienced, it’s quicker; if not, expect a slightly longer process. Patience guarantees you get it done correctly, keeping your brakes reliable and your drive smooth.
Are There Different Types of Brake Pads I Should Consider?
You should consider different brake pad materials, like ceramic, semi-metallic, and organic, based on your driving needs. Each type offers unique benefits, such as noise levels or durability. Also, check for wear indicator signals, which alert you when the pads need replacing. Choosing the right brake pads ensures peak performance, safety, and longevity for your vehicle, making your driving experience smoother and more reliable.
Conclusion
Now that you’ve replaced your brake pads, you’re all set to hit the road with confidence. Think of it like giving your car a fresh pair of shoes—both need to be comfortable and reliable. Just remember to double-check everything, test your brakes, and enjoy the smooth stopping power you’ve created. With a little effort, you’ve turned a tricky task into something manageable, making your ride safer and more enjoyable.