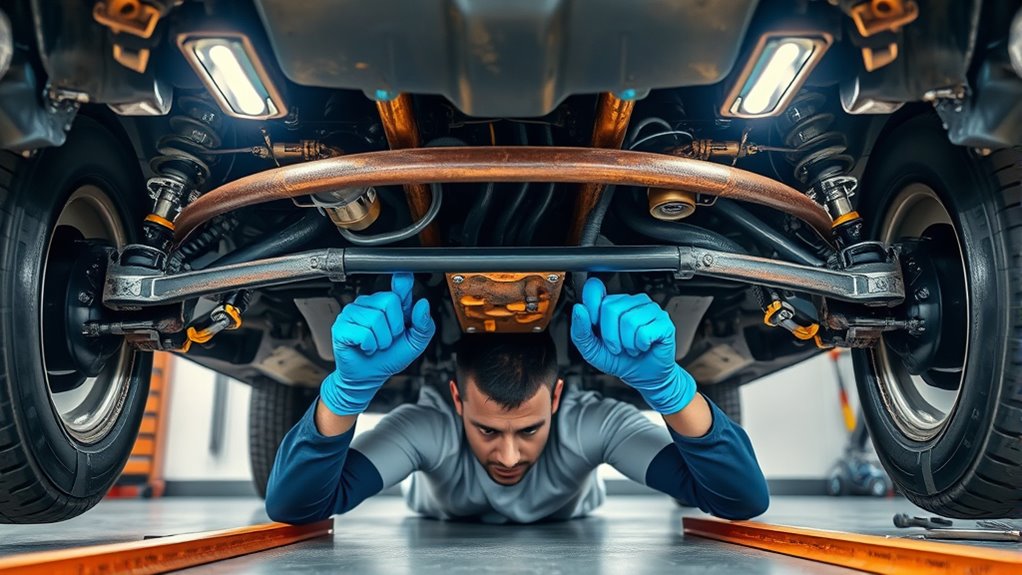

To perform a DIY undercarriage inspection, safely lift your vehicle with a jack and secure it on jack stands on a flat surface. Check suspension components like shocks and control arms for damage, leaks, or corrosion, and look for rust around wheel wells and brake lines. Inspect brake lines for cracks, leaks, or swelling. Remove dirt and mud to get a clear view of critical parts, and identify signs of wear or damage. If you keep exploring, you’ll discover more tips to help keep your vehicle safe.
Key Takeaways
- Safely lift and secure the vehicle on a flat surface using a jack and jack stands before inspection.
- Check suspension components like shocks, control arms, and springs for leaks, cracks, or corrosion.
- Examine brake lines for rust, leaks, cracks, and loose fittings to ensure brake system integrity.
- Remove dirt and debris to reveal rust or damage on wheel wells, suspension mounts, and brake brackets.
- Look for signs of wear, including abnormal tire wear, looseness, or damage, and mark areas needing further inspection.

Performing a DIY undercarriage inspection is a smart way to catch potential issues early and keep your vehicle running smoothly. When you get underneath your car, your goal is to assess the condition of critical parts like suspension components and brake lines. These elements are essential for safety and ride quality, so paying close attention can prevent costly repairs down the road. Start by safely lifting your vehicle with a jack and securing it with jack stands. Make sure the car is on a flat surface and the parking brake is engaged to prevent any movement.
Perform a DIY undercarriage check to spot issues early and ensure your vehicle stays safe and smooth.
Once you’re underneath, begin with the suspension components. Check the shocks, struts, and control arms for signs of wear or damage. Look for leaks, cracks, or corrosion that could compromise the suspension’s integrity. Worn or broken suspension parts can cause uneven tire wear, poor handling, and a rough ride. Feel for looseness or excessive play in the ball joints and bushings. If you notice any abnormal movement or visible damage, it’s a sign that these parts need replacing. Also, inspect the springs for cracks or sagging, which can affect vehicle stability. Being aware of suspension health can help you maintain optimal ride quality.
Next, move to the brake lines. These are crucial for your safety because they carry brake fluid from the master cylinder to the brake calipers or drums. Examine the brake lines carefully for rust, cracks, or leaks. Corrosion can weaken the lines, making them prone to failure. If you see any fluid leaking or the lines appear swollen or cracked, it’s a sign you need to replace them immediately. Don’t forget to check the fittings and connections for tightness and corrosion. A compromised brake line can lead to brake failure, so catching issues early can save you from dangerous situations on the road.
While you’re inspecting, also look at the wheel wells and the underside of the vehicle for debris or rust buildup. Remove any mud or dirt that might obscure your view of important parts. Rust, especially around suspension mounts or brake line brackets, can be a red flag indicating corrosion that needs addressing before it worsens. Rust can also spread and weaken other vital components over time. Use a flashlight for better visibility, and if you find anything suspicious, mark it for further investigation or professional repair.

DNA Motoring 2 Ton Car Jack and Stands Kit 2T(4000 lbs) Capacity Low Profile Hydraulic Trolley Service/Floor Jack with 2 Ratchet Stands Combo for Home Garage Shop, Red/Black, TOOLS-00280
- Hydraulic Jack and Stand Set: Includes 1 floor jack and 2 stands
- Heavy Duty Steel Construction: Durable welded frame design
- Supports Up to 2 Tons: Maximum capacity of 4000 lbs
As an affiliate, we earn on qualifying purchases.
As an affiliate, we earn on qualifying purchases.
Frequently Asked Questions
How Often Should I Perform an Undercarriage Inspection?
You should perform an undercarriage inspection at least once a month to guarantee vehicle safety. Regular vehicle maintenance helps spot issues early, preventing costly repairs. Before inspecting, gather safety equipment like gloves and a flashlight. During your check, look for rust, leaks, or damage. If you notice anything unusual, address it promptly or consult a professional. Consistent inspections keep your vehicle safe and in top condition.
What Tools Are Necessary for a DIY Undercarriage Check?
You need basic inspection tools like a flashlight, jack stands, and a mirror for a thorough undercarriage check. Don’t forget safety gear such as gloves and safety glasses to protect yourself from dirt and debris. With these tools, you can spot rust, leaks, or damage early—saving you from potential breakdowns. Think of it as giving your vehicle a health checkup that could prevent costly repairs down the road.
Can I Inspect My Undercarriage Safely Without Professional Help?
You can safely inspect your undercarriage if you follow proper precautions. Start by cleaning the undercarriage thoroughly to remove dirt and debris, which helps identify rust or damage. Use a jack stand to lift your vehicle securely, then check for rust, corrosion, or leaks. Regular undercarriage cleaning and rust prevention measures make inspections easier and safer, reducing the need for professional help. Always prioritize safety and wear protective gear.
What Signs Indicate Urgent Repairs Are Needed?
Ever wondered when you should call for urgent repairs? Look out for rust formation that’s spreading or flaking, as it weakens your vehicle’s structure. Fluid leaks, especially oil or coolant, are serious signs you need immediate attention. If you notice these issues during your inspection, don’t delay—address them promptly to prevent further damage and make certain of your safety on the road. Wouldn’t you want your car to stay reliable and safe?
Are There Specific Safety Precautions to Follow During Inspection?
You should always wear protective gear like gloves and safety glasses to safeguard yourself from dirt, debris, and potential sharp edges. Make sure you have proper lighting, such as a work flashlight or portable lamp, to clearly see all components. Keep the area stable and avoid working under a raised vehicle without proper support. These safety precautions help prevent injuries and ensure a thorough, safe inspection.
Conclusion
Diligently detail your DIY undercarriage inspection to detect dirt, damage, and deterioration before it worsens. By boldly brushing off the basics and regularly reviewing your ride’s underside, you’re not only saving money but safeguarding your safety. Stay savvy, stay strong, and stay one step ahead by inspecting instinctively. Remember, a small step in inspection can prevent a significant, costly catastrophe. Take charge, stay vigilant, and keep your vehicle’s undercarriage in tip-top shape!